

When it comes to preparing your home for cold weather this winter, insulating your pipes and preventing them from freezing and bursting should be at the top of every homeowner’s to-do list. Pipe insulation is a simple DIY task that can save you a lot of money in repairs and energy costs in the long run.
How to Keep Pipes From Freezing
The last thing you want to come home to after a winter vacation is a flooded home and major water damage due to burst pipes. As water freezes, it expands and increases the pressure inside the pipe, causing it to eventually rupture. Pipes that are more likely to freeze are those close to the house’s exterior walls, in crawl spaces, and in unheated areas. In order to keep water pipes from freezing, you can insulate them with insulation products such as pipe wrap or sleeves.
How to Insulate Pipes
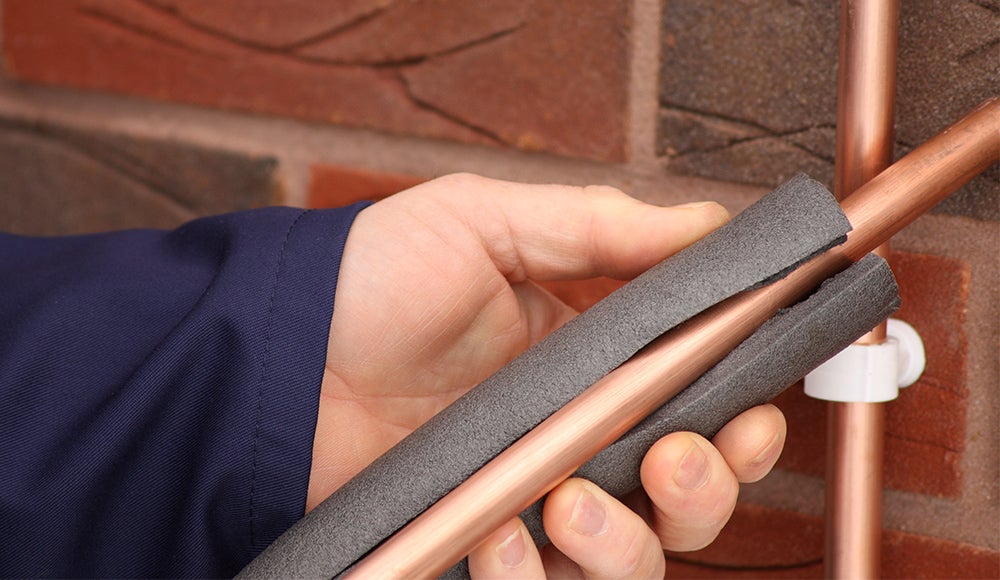
There are a few different types of water pipe insulation. The most common products used by homeowners are polyethylene pipe sleeves and foil or fiberglass pipe wrap. Polyethylene pipe sleeves, which are normally sold in 6-foot lengths, are best for long, straight sections while the foil or fiberglass pipe wrap is useful in smaller areas and tight spaces.
Step 1: The first thing you want to do is measure the pipes you want to insulate and buy enough material to cover them. Measure both the pipe length and its outside diameter so that you purchase the correct size sleeves. Ring’s End carries a variety of different 6-foot sizes such as 1/2”, 3/4”, and 1”. We also have 3-foot ½” and ¾” 4-packs.
Step 2: Cut the insulation to the necessary length. Place the insulation sleeve on the pipe, seam down, and seal (if they are self-sealing). If they don’t have self-adhesive strips, use duct tape, wire, or cable ties to secure the pipe sleeve every two feet.
Step 3: If you use more than one sleeve on a pipe, secure the two together with duct tape.
Step 4: When using pipe wrap, overlap the wrap by at least half an inch, and cover the entire surface of the pipe.
Pipe Insulation Tips
-
If you use fiberglass insulation wrap, wear gloves, long sleeves, and pants when handling.
-
Check your pipe insulation each Fall to assure that the insulation did not come loose.
-
Even if your insulation sleeves are self-sealing, you may want to secure the seams every few feet with small strips of duct tape.
-
If insulating all of your water pipes seems too daunting, focus first on insulating any water supply pipes that bring water in, as opposed to drain pipes, which take water out. Many people insulate drain pipes to be safe, but they are less likely to hold large amounts of water and cause damage.
-
If you’re worried about an exposed pipe in a really frigid environment, you can install an electric heating cable, such as the Frost King Electric Water Pipe Heating Cable, which is automatically activated and deactivated by a built-in thermostat. Just wrap it around your pipe and secure it with a fiberglass or foam and foil pipe wrap.
-
Ring's End also carries 90° elbow connector pipe sleeves to make covering corners easy.
-
Please always follow the manufacturer’s instructions for installation or hire a professional to do the work if you’re uncomfortable with DIY pipe insulation.
The Benefits of Insulating Pipes
Aside from avoiding a flooded house in the middle of winter, there are other benefits to insulating your pipes.
Reduced Heat Loss
Insulating hot water pipes can bring you energy savings by reducing the amount of heat lost to the surrounding air when water flows from your hot water heater. This may allow you to lower the temperature settings on your water heater. In addition to lower monthly energy bills, you won’t have to wait as long for hot water to hit your faucets and you won't risk burning yourself on exposed hot water pipes.
Environmental Benefits
Reducing energy cost not only saves you money, but also helps protect the environment and creates a healthier living space in your home. Insulating cold water pipes prevents them from sweating, which in turn decreases humidity. Lower humidity levels also decrease mold growth in your home.
Cheaper Than Repairing a Broken Pipe From Freezing
Fixing a frozen pipe that bursts can cost up to $2,000, depending on how large it is and where it’s located, and flood remediation can cost five times that! Insulating your pipes is a really inexpensive way to avoid a very costly problem and save money in the long run.