


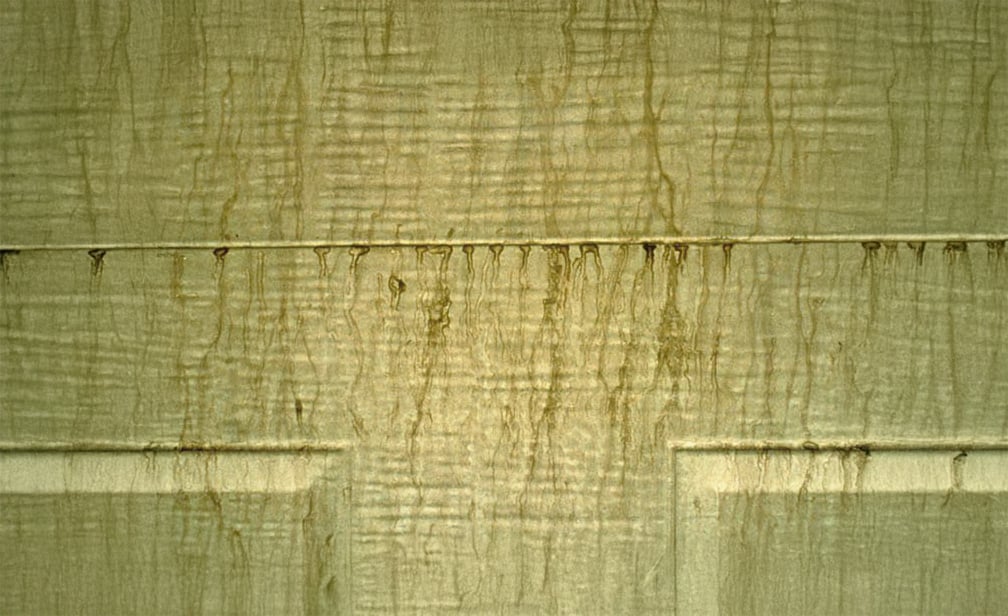
As a painting professional, surfactant leaching—areas of the wall that appear as glossy, soapy, or blotchy drips, sometimes with a tan or brownish cast—can present a significant challenge. This guide offers a clear and practical approach to diagnosing and resolving surfactant leaching problems.
What is Surfactant Leaching?
Surfactant leaching occurs when surfactants (water-soluble elements) in water-based latex paint migrate to the surface, creating discolored areas. It can occur on both interior and exterior surfaces.
Dark colors are more likely to experience this leaching or “weeping” because deeper color paints that are tinted with universal colorant contain more surfactants.
Surfactant leaching typically happens soon after painting, often following exposure to moisture or high humidity. The bad news is that it ruins the look of a fresh paint job. The good news is that it’s generally not harmful to the paint and doesn’t affect long-term durability.
What are paint surfactants?
Surfactants are water-soluble compounds added to paint formulations to enhance various properties such as spreadability, stability, and overall consistency. They help disperse pigments evenly, reduce surface tension for improved flow, and facilitate uniform coating.
When paint dries under normal conditions, these surfactants either evaporate or harden into the surface. However, when dry times are extended or humidity is high, surfactants leach to the surface of the paint.
Diagnosing Surfactant Leaching
If a homeowner asks, “Why is my wall paint streaky?”, the answer may be surfactant leaching. Here’s what to look for:
Glossy or sticky streaks on newly painted surfaces
Staining that wipes off easily with water, but may reappear after drying
Appears in an area prone to humidity such as bathrooms, kitchens, or exterior surfaces
Common Causes of Surfactant Leaching
Interior Ventilation or Humidity Affecting Interior Paint
High indoor humidity levels, especially in kitchens, bathrooms, and laundry rooms
Poor ventilation during and after paint application, which prolongs dry time and allows surfactants to rise to the surface
Using cooling systems excessively, causing condensation that accelerates surfactant migration
Painting surfaces that are not fully dry due to recent cleaning
Broken or older bathroom ventilation fan

Ring’s End Pro Tip: Confirm that the streaking is coming from within the paint before deciding the problem is surfactant leaching. In a humid bathroom, rust or minerals in the water may be causing reddish-brown streaking on the walls.
Environmental Conditions Affecting Exterior Paint
- Painting during high humidity weather conditions or immediately before rainfall
- Temperature fluctuations that cause a heavy morning dew or an overnight frost
- Painting on surfaces exposed directly to excessive moisture, such as near downspouts, sprinklers, or frequently damp areas
Application Errors
- Applying overly thick coats of paint, which prevents timely curing
- Inadequate drying time between coats, trapping moisture
- Painting during conditions where the surface temperature is below the recommended guidelines for proper drying
Choosing the Wrong Paint
- Using lower-quality paints that contain excess surfactants
- Choosing a paint that’s unsuitable for high-humidity areas or moisture-prone surfaces
Effective Solutions for Surfactant Leaching
Remediating surfactant leaching can be time-consuming, but the stains can usually be removed through patient effort. Your strategy will differ for interior walls or ceilings versus exterior surfaces, so the steps below address both separately.
Step 1: Cleaning and Removal of Surfactant
Cleaning Interior Substrates
- Once paint has cured enough to form a film, gently wash affected areas using warm, clean water and mild detergent.
- Rinse thoroughly to remove all residues.
- Allow surfaces to dry completely.
- Repeat until the leaching stops.
Cleaning Exterior Surfaces
- Time and exposure to the elements often remove the discoloration.
- Wait 3–6 months before considering repainting to see if the problem resolves with normal weathering.
- Depending on the size of the affected area, gently washing with a garden hose may be an option.
Step 2: Repaint the Surface if Needed
If the problem persists after multiple cleaning attempts, repainting may be the best option. Follow these steps to prevent recurrence of the leaching problem.
Choose the Right Paint and Primer
- Use a high-quality, low-surfactant paint. Benjamin Moore’s Gennex Color Technology uses custom pigments that reduce surfactants.
- Choose a paint suited for the environment. For example, Aura Bath & Spa is ideal for humid bathrooms.
- Select a mildew-resistant primer with excellent adhesion, like Fresh Start High-Hiding Primer.
Prepare the Surface
- Wash the surface to remove residual surfactants thoroughly.
- Allow ample drying time, then use a moisture meter to confirm dryness.
- Sand lightly to improve paint adhesion if needed.
Use Best Practices for Repainting
- Prime to prevent surfactants in old paint from leaching through.
- Apply paint in thin, even coats for proper curing.
- Allow adequate drying time between coats. For Aura Bath & Spa, wait 24–48 hours before humid showers. Use quick or cooler showers for 3–7 days to aid curing.
Prevention Strategies for Future Projects
Preventive measures significantly reduce the likelihood of surfactant leaching:
- When painting exteriors, monitor weather conditions closely. Avoid big temperature drops after painting, as well as high humidity, rainy, or overly damp weather. These factors can impact paint film formation. See our exterior painting weather guide for more info.
- Ensure surfaces are completely dry before painting.
- Educate clients about maintaining low humidity and good ventilation during and after painting.
- Allow paint to cure sufficiently before exposing it to moisture. Most bathroom paints recommend 24–48 hours of curing before using the shower or bath.
Ring’s End Is Here for You
Still have questions? Our paint team is always happy to help solve problems and provide product recommendations. You can contact a real person using our online chat, by phone, or by texting (203)-PRO-HELP.
Here at RingsEnd.com, we carry a complete line of paint supplies and tools – and we also ship Benjamin Moore products virtually anywhere in the U.S. (excluding AK, HI, and SC). Avoid the hassle of waiting for a paint order to be mixed by ordering your Benjamin Moore products online. You’ll find ordering paint and supplies ahead of time is a great time-saver!
Live in the Northeast? You can also pick up paint orders at one of our 34 conveniently-located paint stores or arrange for delivery from Ring’s End to your door.